
If you have ever opened a biology textbook and stared at a flat, two-dimensional diagram of a cell, you probably felt something was missing. Those colorful circles and ovals on a printed page barely scratch the surface of what actually happens inside a living cell. The real structure is layered, crowded, and far more fascinating than any flat sketch can communicate. That is exactly why a 3D of animal cell has become one of the most popular and effective ways to learn biology, whether you are a sixth grader preparing for a science fair or a college student deep into molecular biology coursework.
Cell biology sits at the heart of every living organism. Understanding how organelles work together inside a single cell gives you the foundation for everything from genetics and medicine to environmental science and biotechnology. Yet for many students, cells remain abstract and forgettable. The names blur together. The shapes seem random. And the spatial arrangement of parts inside the cell never really clicks — until you see it, touch it, or build it in three dimensions.
That is where a 3D of animal cell steps in as a game-changer. Whether it takes the form of a clay model on a kitchen table, a digitally rendered masterpiece on a computer screen, or an interactive virtual experience inside a headset, the third dimension brings cellular biology to life in a way that no diagram can match. In this guide, you will learn everything you need to know about building, exploring, and understanding animal cells through three-dimensional models. We will cover the core structure of the cell itself, the different types of models you can create, a step-by-step project walkthrough, the educational benefits backed by real research, and the best tools available right now. By the time you finish reading, you will have a clear roadmap for your own project — and a much deeper appreciation for the tiny powerhouse that keeps every animal on the planet alive.
What Is an Animal Cell and Why Does It Matter?
Before you build anything, you need to understand what you are building. An animal cell is a eukaryotic cell, which simply means it has a clearly defined nucleus enclosed within a membrane. Unlike plant cells, animal cells do not have a rigid cell wall or chloroplasts. They are generally smaller, more flexible, and come in a wide range of shapes depending on their function — from flat, disc-shaped red blood cells to long, branching neurons.
Core Structure of an Animal Cell
Every animal cell contains a set of specialized structures called organelles. Think of these as the tiny organs that keep the cell running. There are roughly thirteen major components you should know, and each one has a distinct shape, size, and job.
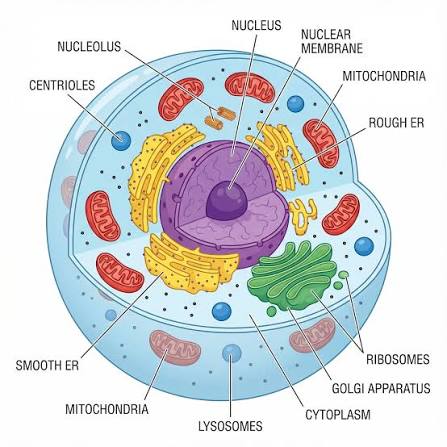
The cell membrane forms the outer boundary. It controls what enters and exits the cell, much like a security gate. Inside that membrane sits the cytoplasm, a gel-like fluid that fills the cell and holds everything in place. At the center, you will find the nucleus, which acts as the command center by housing the cell’s DNA. Tucked within the nucleus is the nucleolus, responsible for producing ribosomes.
Speaking of ribosomes, these tiny structures are scattered throughout the cell and play a critical role in building proteins. The rough endoplasmic reticulum is studded with ribosomes and folds proteins, while the smooth endoplasmic reticulum handles lipid production and detoxification. The Golgi apparatus packages and ships molecules to their correct destinations — think of it as the cell’s post office.
Then there are the mitochondria, often called the powerhouses of the cell because they generate most of its energy. Lysosomes act as the cleanup crew, breaking down waste and worn-out parts. Vacuoles store water, nutrients, and waste. The centrosome helps organize cell division, and the cytoskeleton provides structural support and aids movement, functioning like an internal scaffolding system.
Each of these parts has a unique three-dimensional shape and position relative to the others. That is something a flat diagram simply cannot convey, and it is the main reason why building a 3D of animal cell is such a powerful learning exercise.
How a 3D Model of Animal Cell Improves Understanding
Research in educational psychology supports a concept known as dual-coding theory. This theory states that the human brain processes visual information and verbal information through two separate mental channels. When both channels are activated at the same time — as they are when a student looks at, touches, and discusses a physical model — learning deepens and retention improves significantly.
Studies published in journals like the International Journal of STEM Education have found that students who interact with three-dimensional biological models consistently score higher on knowledge tests compared to peers who rely only on static images. The reason is straightforward. A 3D model of animal cell reveals spatial relationships that a textbook hides. You can see how the rough endoplasmic reticulum connects directly to the nuclear envelope. You notice that mitochondria are scattered randomly throughout the cytoplasm, not lined up in a neat row like a diagram might suggest. You realize that the Golgi apparatus sits near the nucleus for a reason — proximity matters in cellular logistics.
This kind of spatial awareness does not come from reading. It comes from seeing depth, rotating a structure, and understanding how parts relate to each other in real space. That is what makes three-dimensional cell models so effective, and why educators at every level are embracing them.
Types of 3D Animal Cell Models You Can Build or Explore
Not every 3D of animal cell looks the same, and that is a good thing. Different formats serve different learners, different budgets, and different goals. Here is a breakdown of the main categories.
Physical Hands-On Models
Physical models remain the most popular choice for classroom projects, science fairs, and homeschool assignments. They are tangible, creative, and require no special technology.
Styrofoam and clay models are the classic approach. You start with a foam ball, cut it in half to expose a cross-section, and then use colored modeling clay to shape each organelle. Toothpicks with paper flags serve as labels. This method is affordable, accessible, and satisfying to build. It works best when you use a different color for each organelle so viewers can quickly distinguish one part from another.
Edible models take a more playful route. Gelatin or cake acts as the cytoplasm base, and candy pieces represent the organelles — gummy worms for the endoplasmic reticulum, jawbreakers for the nucleus, jelly beans for mitochondria. These models are fantastic for younger students because they combine learning with a treat at the end. The downside is durability. An edible animal cell 3D model will not survive more than a day or two without refrigeration.
3D-printed models bring modern technology into the mix. Using free CAD software like Tinkercad, students design their cell digitally and then print it in durable, color-coded plastic. This method teaches both biology and design thinking at the same time. Schools with access to even a basic desktop 3D printer can produce models that are anatomically accurate, reusable, and visually stunning.
Digital and Interactive 3D Models
Not every project needs to be physical. Digital models offer advantages that clay and foam simply cannot match.
Web-based platforms like Sketchfab and BioDigital host thousands of pre-built, interactive cell models. Users can rotate the model 360 degrees, zoom into individual organelles, and read pop-up descriptions — all from a browser window. This is particularly useful for remote learners or students reviewing material at home.
Augmented reality and virtual reality applications push the experience even further. Some AR apps allow you to point your phone at a flat surface and project a 3D of animal cell right onto your desk. VR headsets go a step beyond, immersing you inside a life-sized cell where you can walk among the organelles and observe their functions up close. Educational metaverse platforms are even beginning to offer collaborative virtual labs where multiple students explore cell structures together in a shared digital space.
3D HD Realistic Rendering of the Mitochondrion and Other Organelles
At the professional end of the spectrum, CGI artists and scientific illustrators use advanced rendering software to produce stunningly lifelike images and animations of cellular structures. A 3D HD realistic rendering mitochondrion animal cell, for example, can show the delicate folds of the cristae membranes, the granular texture of the matrix, and the translucent quality of the outer membrane — details that simplified models leave out entirely.
Tools like Blender, Autodesk Maya, and Cinema 4D are commonly used for this kind of work. Artists apply physically accurate lighting, surface textures, and depth-of-field effects to create visuals that rival electron microscope photography. These renderings appear in university textbooks, medical training simulations, and science documentaries. They represent the gold standard in cell visualization and serve as excellent reference material for anyone building their own model, whether physical or digital.
Step-by-Step Guide to Building a 3D of Animal Cell for School Projects
Now that you understand the different types, let us walk through the most common approach: building a physical 3D project of an animal cell using everyday materials. This guide works for students at any level, from middle school through introductory college biology.
Planning and Gathering Materials
Every good project starts with preparation. Before you touch a single piece of clay, sit down with a detailed animal cell diagram and study the placement of each organelle. Knowing where everything goes ahead of time will save you from having to tear apart a half-finished model later.
For a physical build, here is what you will need: a 10-inch styrofoam ball (or a large plastic bowl as an alternative base), acrylic paints in at least two neutral colors, modeling clay in six or more distinct colors, toothpicks, cardstock or small sticky labels, a fine-tipped marker, strong-hold craft glue, and a sturdy piece of cardboard or a wooden board to serve as a display base. If you prefer a digital route, download Tinkercad for a beginner-friendly experience or Blender if you want more creative control. Both are free.
Building the Cell Membrane and Cytoplasm
Start with your foam ball. Using a sharp knife (with adult supervision for younger students), carefully cut away one-quarter of the ball. This exposes the interior and gives viewers a clear cross-section of the cell’s insides. The rounded exterior represents the cell membrane.
Paint the outside of the ball in a light color — pale yellow, soft blue, or light green all work well. If you want to get creative, use a metallic marker to add tiny dots across the surface. These dots represent the protein channels and pores that allow molecules to pass through the membrane. Once the exterior dries, paint the exposed interior with a slightly different shade to represent the cytoplasm. This color contrast helps viewers instantly distinguish the inside from the outside.
Crafting and Placing Each Organelle
This is the most enjoyable part of the entire 3D project of an animal cell, and it is where your model really comes alive.
Nucleus and nucleolus: Roll a medium-sized ball of dark-colored clay and press it gently into the center of the exposed interior. Then take a tiny piece of contrasting clay, roll it into a small sphere, and embed it into the nucleus. That small sphere is the nucleolus. The nucleus should be the largest single organelle in your model, sitting near the middle of the cell.
Endoplasmic reticulum: For the rough ER, roll out thin, wavy strips of clay and press tiny beads along their surface to represent attached ribosomes. For the smooth ER, create similar wavy strips but leave the surface clean. Position both near the nucleus, since the rough ER is physically connected to the nuclear envelope in a real cell.
Mitochondria: Shape small ovals from a warm color like orange or red. Use a toothpick or the edge of a craft knife to score lines across the inside of each oval. These lines represent the cristae, the folded inner membranes where energy production happens. Place two or three mitochondria at different spots throughout the cytoplasm. Do not cluster them — in real cells, they are spread out to supply energy wherever it is needed.
Golgi apparatus: Flatten several thin discs of clay and stack them slightly offset from one another, like a pile of deflated balloons. Position this stack near the nucleus. The Golgi apparatus receives, processes, and ships molecules, so its location close to the nucleus and ER makes biological sense.
Ribosomes: Roll tiny beads of a single color — something bright like purple or teal — and scatter them throughout the interior of the cell. Some should sit on the rough ER strips, and others should float freely in the cytoplasm. You will need quite a few, since ribosomes are among the most numerous organelles in any animal cell.
Lysosomes and vacuoles: Make small, round balls of clay for lysosomes and slightly larger, irregular shapes for vacuoles. Place a few of each in open spaces between the larger organelles. Remember, animal cell vacuoles are much smaller than the large central vacuole found in plant cells, so keep them modest.
Centrosome and cytoskeleton: The centrosome can be represented by two tiny cylinders placed near the nucleus at right angles to each other. For the cytoskeleton, thin strands of wire or string stretched across the interior give a nice visual effect, though many students skip this part for simplicity.
A general rule to follow: place the largest organelles first, then fill in the gaps with smaller ones. This approach prevents overcrowding and keeps the model looking clean and accurate, much like arranging furniture in a room before adding decorations.
Labeling, Finishing, and Presenting Your Model
Once every organelle is glued securely in place, it is time to label. Cut small rectangles from cardstock, write the name of each organelle in clear print, and attach them to toothpicks. Press each labeled toothpick into the clay next to the corresponding structure. Make sure the text faces outward so viewers can read it without having to spin the model around.
For durability, spray the finished model with a clear acrylic sealant. This prevents the clay from cracking and gives the whole project a polished, professional look. If you are presenting in class, prepare a short spoken explanation for each organelle — what it does, why it matters, and how it connects to other parts of the cell. Practicing this beforehand builds confidence and shows your teacher that you truly understand the material, not just the craft.
Benefits of Using a 3D of Animal Cell in Education
Building or exploring a 3D of animal cell is not just a fun activity. It delivers real, measurable educational benefits that go well beyond memorizing vocabulary.
Deeper Retention and Engagement
Students who physically construct a model or interact with a digital one retain organelle names and functions significantly longer than those who only read about them. The act of shaping a mitochondrion from clay, choosing its color, and deciding where to place it forces the brain to engage with the information on multiple levels — visual, tactile, and cognitive. This multi-sensory involvement creates stronger memory traces.
Hands-on projects also reduce the intimidation factor that many students feel around science. A student who struggles with dense textbook paragraphs may thrive when given clay and a foam ball. The creative element makes biology feel approachable rather than overwhelming, which is especially important for younger learners encountering cell biology for the first time.
Developing Spatial and Critical Thinking Skills
Constructing a 3D of animal cell forces you to think about proportion, scale, and spatial relationships. How big should the nucleus be relative to the mitochondria? Where does the Golgi apparatus sit in relation to the endoplasmic reticulum? These decisions require critical thinking and problem-solving — skills that extend far beyond biology class.
Research has shown that visuospatial reasoning is a strong predictor of success in STEM careers. Students who develop these abilities early through projects like cell modeling are better prepared for advanced courses in anatomy, engineering, architecture, and medical science. In other words, the skills you build while crafting a cell model today may pay dividends for years to come.
Accessibility and Inclusivity
Three-dimensional models serve learners who are often underserved by traditional teaching methods. For visually impaired students, a tactile model provides information that no amount of verbal description can fully convey. They can feel the ridges of the endoplasmic reticulum, the smooth surface of the nucleus, and the scattered placement of ribosomes — gaining understanding through touch that sighted students gain through sight.
Digital 3D models also remove geographic and financial barriers. A student in a rural school with a limited science budget can access the same high-quality interactive cell model as a student in a well-funded urban lab, provided they have an internet connection. Platforms that host free, browser-based models are leveling the playing field in science education worldwide.
Tools and Resources for Creating a Stunning 3D Model of Animal Cell
Whether you are going the physical route or the digital one, having the right tools makes all the difference.
Free and Beginner-Friendly Software
Tinkercad is a browser-based CAD tool perfect for students who have never touched 3D design software before. Its drag-and-drop interface lets you build shapes, resize them, and combine them to form organelles with almost no learning curve. You can design an entire animal cell 3D model in a single afternoon and either 3D-print it or present it as a rotating digital file.
Sketchfab is a platform that hosts thousands of pre-built, user-uploaded models. You can find detailed, labeled animal cell models ready to explore, download, and even embed in a school presentation. For students who want to study structure rather than build from scratch, this is an excellent starting point.
BioDigital and Visible Body are purpose-built biology visualization platforms. They offer interactive, anatomically accurate cell models with clickable labels and pop-up descriptions. These tools are especially useful for teachers who want to project a rotating model onto a classroom screen during a lecture.
Advanced Rendering and Printing Tools
For those who want to go beyond the basics, Blender is a free, open-source 3D software capable of producing photorealistic images and animations. With the right textures and lighting, you can create a 3D HD realistic rendering of any organelle — from the double-membrane structure of the mitochondrion to the folded cisternae of the Golgi. Medical illustrators and documentary producers use Blender regularly for this exact purpose.
Autodesk Maya and Cinema 4D are industry-standard tools used by professional studios. They offer more advanced features and smoother workflows for animation, but they come with a steeper learning curve and, in some cases, a price tag. Student licenses are often available at reduced cost.
On the hardware side, affordable desktop 3D printers from brands like Creality and Bambu Lab have made it possible for schools to print physical models directly from digital files. Paired with free slicing software like Cura, a well-designed digital cell can become a durable, color-coded classroom model in just a few hours.
Classroom Kits and Ready-Made Resources
Not everyone needs to start from zero. Commercial kits like the NewPath Learning Animal Cell 3D Model Kit come with pre-cut paper parts, assembly instructions, and a teacher resource guide aligned to Next Generation Science Standards. These kits are designed for cooperative learning — one box typically includes materials for five student groups.
Educator marketplaces also offer downloadable project guides, printable rubrics, and detailed instructions for structured 3D project of an animal cell assignments. These resources save teachers hours of planning time and ensure that every student follows a consistent, graded process.
Conclusion
A 3D of animal cell is far more than a school project. It is a gateway into understanding how life works at its most fundamental level. Whether you mold organelles from colored clay, design them on a screen, or explore a photorealistic rendering in virtual reality, the third dimension transforms cell biology from a dull list of vocabulary words into a vivid, memorable experience.
Physical models build creativity and hands-on skills. Digital models offer accessibility and depth. Realistic renderings push scientific accuracy to its highest level. Each approach serves different learners and different goals, but they all share the same outcome: making the invisible visible and turning confusion into clarity.
So pick a method that fits your situation. Grab a foam ball and some clay, open Tinkercad on your laptop, or download an interactive model onto your phone. The best way to understand a cell is not to read about one — it is to build one, spin one, and explore one from every possible angle. Start today, and you will never look at a flat textbook diagram the same way again.
Frequently Asked Questions
1. What is a 3D of animal cell? A 3D of animal cell is a three-dimensional representation of an animal cell’s internal structure, built either physically with materials like clay and foam or digitally using software such as Tinkercad or Blender. Its purpose is to show the shape, size, and spatial arrangement of organelles in a way that flat textbook diagrams cannot achieve.
2. What are the 13 main parts of an animal cell included in a 3D model? A complete 3D model should include the cell membrane, cytoplasm, nucleus, nucleolus, mitochondria, rough endoplasmic reticulum, smooth endoplasmic reticulum, Golgi apparatus, ribosomes, lysosomes, vacuoles, centrosome, and cytoskeleton. Each part has a unique shape and function that becomes clearer when viewed in three dimensions.
3. How do you make a 3D animal cell model for a school project? Start by cutting a styrofoam ball in half and painting it to represent the cell membrane and cytoplasm. Then use colored modeling clay to shape each organelle and glue them inside the ball, placing larger structures like the nucleus first. Finish by attaching labeled toothpick flags to identify every part.
4. What materials do you need to build a 3D of animal cell at home? The most common materials include a 10-inch styrofoam ball, modeling clay or Play-Doh in multiple colors, acrylic paints, craft glue, toothpicks, cardstock for labels, and a sturdy baseboard for display. Household items like beads, buttons, pipe cleaners, and small candies can also represent smaller organelles.
5. What is the difference between a 3D plant cell model and a 3D animal cell model? An animal cell model lacks a cell wall, chloroplasts, and a large central vacuole, which are all present in plant cell models. Animal cells are also rounder and more irregular in shape, while plant cells tend to have a rigid, rectangular form due to the cell wall.
6. Can you make an edible 3D animal cell model? Yes, edible models are very popular for classroom projects. Gelatin or cake serves as the cytoplasm base, and candy pieces represent individual organelles — gummy worms for the endoplasmic reticulum, a jawbreaker for the nucleus, and jelly beans for mitochondria. Just keep it refrigerated until presentation time.
7. What is the best software for making a digital 3D model of animal cell? Tinkercad is the best free option for beginners because of its simple drag-and-drop interface that works directly in a web browser. Blender is ideal for advanced users who want photorealistic results, while platforms like Sketchfab let you explore pre-built interactive cell models without designing from scratch.
8. Why is a 3D model better than a 2D diagram for learning about animal cells? A 3D model activates both visual and tactile learning channels, which strengthens memory retention according to dual-coding theory in educational psychology. It also reveals spatial relationships between organelles — such as how the rough ER connects to the nuclear envelope — that flat diagrams completely obscure.
9. How does a 3D of animal cell help students score better in science? Studies published in STEM education journals show that students who interact with three-dimensional models score higher on knowledge retention tests than those who study only from flat illustrations. The hands-on process of building or manipulating a model engages multiple senses, creating stronger and longer-lasting memory connections.
10. What does a 3D HD realistic rendering of a mitochondrion animal cell look like? A realistic rendering shows the mitochondrion’s double membrane, the folded cristae structures inside, and the granular texture of the matrix, all with lifelike lighting and surface detail. Professional illustrators use software like Blender, Maya, or Cinema 4D to produce these visuals for textbooks, medical training, and science documentaries.
11. How many organelles should I include in a 3D animal cell project? A thorough project should include at least ten to thirteen organelles covering the nucleus, nucleolus, cell membrane, cytoplasm, mitochondria, rough ER, smooth ER, Golgi apparatus, ribosomes, lysosomes, vacuoles, centrosome, and cytoskeleton. Always check your teacher’s rubric, as some assignments require fewer or additional structures.
12. What household items can represent organelles in a 3D animal cell model? Common substitutes include a small bouncy ball or an orange for the nucleus, gummy worms or pipe cleaners for the endoplasmic reticulum, jelly beans or painted peanuts for mitochondria, stacked flat buttons for the Golgi apparatus, small beads for ribosomes, and marbles for lysosomes. Creativity is encouraged as long as shapes are accurate.
13. How long does it take to build a physical 3D of animal cell? Most physical models take between three to five hours spread across two days, since the paint and glue need drying time between steps. Planning your organelle colors and placement in advance, and gathering all materials before you start, will significantly speed up the build process.
14. Can you 3D print an animal cell model? Yes, 3D printing an animal cell model is increasingly popular in schools and STEM programs. Students design the cell using free CAD software like Tinkercad, then print it using an affordable desktop printer from brands like Creality or Bambu Lab. The result is a durable, color-coded, anatomically accurate model that can be reused for years.
15. What is the function of mitochondria in a 3D animal cell model? Mitochondria are known as the powerhouses of the cell because they produce most of the cell’s energy in the form of ATP through cellular respiration. In a 3D model, they are typically represented as small oval shapes with internal zigzag lines or ridges to show the cristae folds where energy production occurs.
16. How do you label a 3D animal cell model for a science fair? Cut small rectangles from cardstock, write the organelle name clearly in print, and attach each label to a toothpick or small wooden skewer. Press each labeled pick into the clay next to the corresponding structure, making sure the text faces outward for easy reading during presentations.
17. Are there ready-made kits for building a 3D of animal cell? Yes, several companies offer pre-packaged kits designed for classroom use. NewPath Learning, for example, sells a 3D Animal Cell Model Kit that includes pre-cut paper components, a teacher resource guide, and assessment rubrics aligned to Next Generation Science Standards. Each kit typically contains enough materials for five student groups.
18. What is the role of the Golgi apparatus in an animal cell? The Golgi apparatus acts as the cell’s packaging and distribution center. It receives proteins from the endoplasmic reticulum, modifies and sorts them, and then ships them in vesicles to their final destinations inside or outside the cell. In a 3D model, it is usually represented as a stack of flattened discs placed near the nucleus.
19. Can augmented reality or virtual reality be used to explore a 3D of animal cell? Yes, several AR and VR applications now allow students to explore animal cell structures in immersive environments. AR apps can project a 3D cell onto a classroom desk through a smartphone camera, while VR headsets let learners walk inside a life-sized cell and examine organelles up close in a fully immersive experience.
20. What is the largest animal cell in the world? The ostrich egg is the largest known animal cell, measuring over 5.1 inches (13 cm) across. In contrast, most animal cells are microscopic — a human neuron, for example, measures just about 100 microns. This enormous size range is one reason why 3D models are so helpful for understanding scale in cell biology.
21. How does building a 3D animal cell model develop STEM skills? Constructing a 3D model builds visuospatial reasoning, proportional thinking, design planning, and problem-solving skills — all of which transfer directly to STEM careers in medicine, biotech, engineering, and architecture. Research shows that students who develop these abilities early perform better in advanced science and math coursework.
22. What is the difference between a eukaryotic and prokaryotic cell in a 3D model? A eukaryotic cell, such as an animal cell, has a defined nucleus enclosed by a membrane along with specialized organelles like mitochondria and the Golgi apparatus. Prokaryotic cells lack a membrane-bound nucleus and most organelles, making them simpler and smaller. A 3D model highlights these differences through visible structural complexity.
23. How can visually impaired students benefit from a 3D of animal cell? Tactile 3D models allow visually impaired learners to feel the shapes, textures, and positions of organelles through touch. A student can trace the ridged surface of the endoplasmic reticulum or feel the smooth sphere of the nucleus, gaining spatial understanding that verbal descriptions alone cannot fully provide.
24. What are the most common mistakes students make when building a 3D animal cell model? The most frequent errors include accidentally adding plant-cell-only structures like a cell wall or chloroplasts, making all organelles the same size, placing the nucleus off-center, and forgetting to label every part clearly. Using a reference diagram throughout the building process and double-checking your teacher’s rubric before finishing will help avoid these pitfalls.